<a href="menu.shtml">Table of Contents</a>
<br>
How to Add Text to a Photo Album Print Page
When you are in the Print Page Layout window, arrange your photos the way you want them and then
click the Text button in the upper right corner:

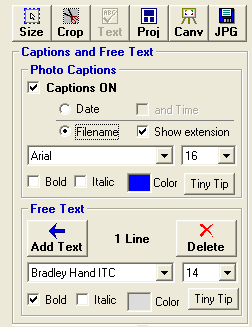
The text tool panel will then appear:

The text tool panel will let you Add Captions or add Free Text to the print page.
Captions: will add a text box under each photo and will automatically display the picture's file name or the date/time.
Which is nice for creating Proof Sheets
Free Text: will allow you to add many lines of text to the album print page.
- Click the Add Text button to add a line of text to the page.
- A text box will appear on the page
- Click the text box and type your text
- A blue border will appear around the text box. Click and drag the blue border and you can move the
text box to any location on the print page
- Click and drag one of the green boxes on either side of the text box and you can change the width of the box
- You may add as many lines of text as you like
- Text lines are single lines - no carriage return - add more lines to have multiple lines
You may place text around your digital photos or right on top of your photos.
Note: If you put text on top of a picture: all printers behave in one of two ways
when a line of text is on top of a photo:
- The text will have a white block background when on a photo
- The text will be directly on the photo with a transparent background
PhotoELF does not have control over this behavior. Your printer will behave in one of these two ways in this situation.
If you wish to have your text on a photo, but Not have a white block background, and your printer behaves this way, then you
may wish to add the text directly to the photo in the Editor. See: Add Text and Shapes to a Photo.
Another thing you can do, is convert the entire page to one big photo, save it and then print it. See:
Merging Photos
Combine Photos Example
Stitch Photos Example
Be sure to click the Tiny Tip buttons for more information.
Home
Privacy Policy
PhotoELF
Download PhotoELF

