<a href="menu.shtml">Table of Contents</a>
<br>
Lesson 3: Creating a Watermark to apply to a photo

 |
+ |
 |
= |
 |
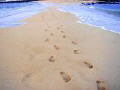
| Original |
|
Mask |
|
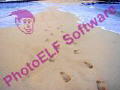
Finished |
Before proceeding with this lesson, review Lesson 1 first.
Lesson 3: Creating a Watermark
- Load PhotoELF's Editor
- Look in the Fun Stuff menu and select New Image (blank)
- Select a size of 800 x 600 pixels and a white background color and click OK
- Look in the View menu and select: Shapes and Text
- This time, instead of shapes, you will add Text to the black image
- Add some Text to the image
- Make the text either black or a shade of grey
- If it is black, it will be a solid color when done
- If it is grey, it will be semi-transparent
- If grey, the closer to black it is, the more opaque
- If grey, the closer to white it is, the more transparent
- You should now be looking at something like this:

- You may position the text anywhere you like
- When ready, look in the FILE menu and select: Save as Mask
- Done
- Close the Editor and load a photo and test your new mask.
Learn how to make Diagonal Text
Next Lesson: Lesson 4: Mask Behavior
Home
Privacy Policy
PhotoELF
Download PhotoELF