<a href="menu.shtml">Table of Contents</a>
<br>
Printing a Huge Poster or Banner
This topic will show you how to take one photo and print it out over several sheets of paper.
When done, you will be able to tape all the sheets of paper together to create a huge poster.
This can be really fun for Birthday Parties, Reunions, Weddings, Sporting Events etc.
Do the Following:
- Select the photo you wish to use in PhotoELF's main program.
- Load this photo into the Editor by clicking the Editor button on the toolbar.
- Once the Editor has loaded, look in the Fun Stuff menu
- Select: Create Poster - Slice and Dice a photo
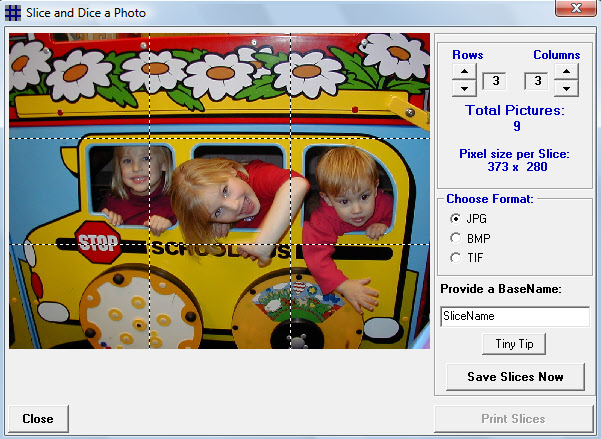
At this point, a new window will appear and allow you to select how many slices you wish to create
of your photo:
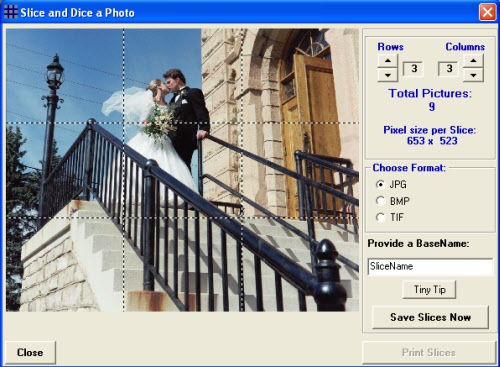
The picture above shows the Slice and Dice window.
In this window, you may select Rows and Columns to increase or decrease the
number of slices to make. Each slice represents one printed sheet of paper.
In the picture above, there are three rows and three columns for a total of nine slices, or nine sheets of paper.
Hint: In most cases, for best results, make the rows and columns be equal, (if you have
four rows, have four columns).
In this example, the finished poster will be approximately 30 inches wide.
More Slices = A Larger Poster
When you have the rows and columns set up the way you want, select an Output Format:
JPG
BMP
TIF
Then select a basename to save the slices:
In the example above, there are three rows and three columns. If a basename of Slice were chosen,
PhotoELF will create nine new image files with the following names:
Slice_1-1.jpg
Slice_1-2.jpg
Slice_1-3.jpg
Slice_2-1.jpg
Slice_2-2.jpg
Slice_2-3.jpg
Slice_3-1.jpg
Slice_3-2.jpg
Slice_3-3.jpg
One new image file for each slice. Each slice will be exactly the same size.
When ready, click the Save button and these slices will be automatically cropped and saved
in the same folder as the original image.
Printing the Slices
After the slices have been created, you will be prompted if you wish to batch print all the slices.
If you choose yes, the slices will automatically be loaded in the print window in Batch Print mode.
If you choose no, you can always batch print them later, because the slices have been
saved in the current folder. For more information on how to batch print your slices later, consult
the help topic: Batch Printing
Completing the Project:
After all slices have been printed, you will need to assemble all the pages in the appropriate order
and tape them together, (sometimes it is easier to tape them to a board or piece of cardboard).
TIP:
A fun trick is to use this method to print out 9 slices of a photo and then frame each of the 9 photos in seperate frames and hang them on the wall.
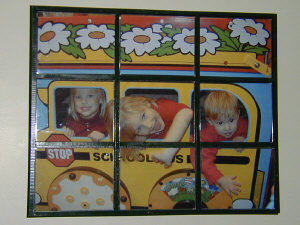
But you will need to get each photo slice to fit in your frame...
To do this, simply crop the original image first, using a cropping ratio that matches the frame size.
Example: If your frames are 8 x 10 inches, then crop the original photo to be: 8 x 10 using the Cropping tool in the
PhotoELF editor and select an 8 x 10 cropping ratio.
Then Slice and dice the photo (make a poster) using an equal number of rows and columns.
Finally, when you print the slices, print them all to be 8 x 10 and they will come out perfect.
Home
Privacy Policy
PhotoELF
Download PhotoELF