<a href="menu.shtml">Table of Contents</a>
<br>
Lesson 8: Organizing the Masks
You may add, remove and organize the masks
Here is how:
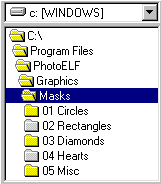
All of the masks are located in the following folder on your hard drive:
C:\Program Files\PhotoELF\Graphics\Masks
Assuming you installed PhotoELF in the default location
 |
|
 |
| Folder Location | |
Mask Catagories |
Use PhotoELF to navigate to the folder structure shown above.
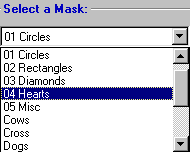
Please Note: The categories that are listed in the Mask window correspond to the
folder names in the Masks folder.
- If you delete a folder, that category will be removed.
- If you create a folder a new category will be created.
- You may create your own masks and place them in any of the existing folders and they will appear the
next time you enter the Mask window in PhotoELF.
Saving Masks:
In all of the lessons so far, you have been told to save a mask by using the PhotoELF Editor, looking in the File menu
and selecting: Save as a Mask. This is the easiest method, but it is not the only method.
You can simply copy any image into one of the mask folders using PhotoELF's Copy or Move commands. Or you can use
Windows Explorer.
Mask Format Rule: Masks must be either JPG or BMP format. That is all that is allowed.
See: Creating your Own Masks
Home
Privacy Policy
PhotoELF
Download PhotoELF

