<a href="menu.shtml">Table of Contents</a>
<br>
Fixing Red-Eye Painting Tools
(Also can fix blue and green eye problems in dogs, cats and pets).

This page covers the following topics:
- How to fix red-eye
- Transparent paint versus opaque paint
- Paint size and shape
- Selecting colors to paint (right and left mouse)
- Fixing blue & green eye in pets
How to Fix Red-Eye
First, load your photo into the PhotoELF Editor, then:
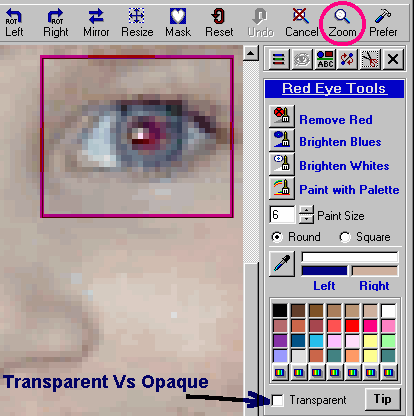
zoom in as far as possible on one eye at a time. To do this,
click the Zoom button on the Editor's toolbar. Then, move your mouse onto the photo and click and drag
a box around the eye. When you release the mouse, the photo will be zoomed in on the eye, making it easier to fix.

- Change the paint size to one pixel to start out. (you can always increase it).
- Click the Remove Red brush
- Move your mouse (brush) onto the red portion of the eye.
- Hold the left mouse button down and begin to paint
Doing so will magically change the red pixels to darker pixels.
The faster or harder you move the brush over an area, the faster it turns darker.
If you goof up, simply click the Undo button on the toolbar, or press the CTRL-Z keys.
You may choose any of the brushes from the tool panel to perform different operations:
1) Remove Red brush - click and drag the brush around the pupil. (This brush is drag sensitive) The more you drag the faster and darker it will get.
Single clicking will produce minor changes.
2) Brighten Blues brush - This is a fixed brush - Once you've painted a pixel, it will not change again with this brush. (Only useful on grey, blue or light colored eyes).
3) Brighten Whites brush - Click and drag vigorously over an area to brighten faster. Single clicking produces small changes at a time. This
brush can whiten the eyes and teeth.
4) Paint with Palette brush - When this brush is selected, the palette is enabled allowing you to select any color you wish.
Transparent Paint versus Opaque Paint
Transparent Paint
You may paint with transparent or opaque paint by checking or unchecking the
Transparent box at the bottom of the tool panel.
When using transparent paint, the original pixels are not over-written, but rather, they
are shifted toward the color you have selected. Once you have painted a pixel with a
transparent
paint color, you will not be allowed to paint that same pixel again with the same color. This is
a good feature, since it will help maintain the original image. You can also create sepia affects using
transparent paint.
If you are trying to paint an area with transparent paint and it appears to have no effect, then you
are painting with a transparent color that is so similar to the original, that you cannot notice the change.
Further, transparent paint does not always produce the exact color you selected - This is
because the original pixels are simply shifted toward the color you selected.
Experimenting with transparent paint is the best way to get a feel for it.
Opaque Paint
Using opaque paint is accomplished by Unchecking the Transparent box at the bottom of the
tool panel.
Opaque painting behaves as you would expect. The color you selected is the color painted and
overwrites the original pixles.
Paint Size and Shape
The paint size may be adjusted from one to 20 pixels in size.
You may also select whether the brush paints a round dot or a square.
Clarification: The paint size is in pixels and it describes the side of a square.
In other Words: If the number five were selected, the actual number of pixels painted is 5 x 5 or 25.
Selecting Colors to Paint
The Dropper: When you pass your mouse over the palette, the dropper automatically
appears, allowing you to select a different color for the left mouse button and the right.
When you click the palette, your selected color will appear in the left or right button window,
depending on which button you click.
You may then paint with either the left or right mouse button.
When painting, click and drag the left button to paint the left color. Click and drag the right
button to paint with the right color.
If you do not find a color you want, click one of the seven rainbow buttons, to define your
own color.
If you click the dropper button, you may also select colors from the image itself, creating a perfect match or blend.
These tools were intended to fix red-eye problems, however, they can be used for other editing
functions, as well.
Fixing Blue and Green Eye in Dogs and Cats
To fix blue eye and green eye problems in pets, you will need to do the following:
- Click the Paint with Palette brush on the tool panel.
- Select a one pixel paint size.
- Make sure there is a checkmark in front of Transparent
- If your pet's eyes should be brown, then try selecting one of the brown colors in the palette.
- Test to see if that color works for you.
You may need to experiment with different colors before you find one that works with your pet's eyes.
Clicking one of the rainbow buttons under the palette will allow you to choose from over 16 million different colors.
Once you find a color that works, you can always use that color for fixing this problem.
Home
Privacy Policy
PhotoELF
Download PhotoELF

